Quantcast

Monday 23 November 2009

The main reason for going to Copenhagen...Noma


We started with a flurry of little treats.

A few biscuits topped with lardo and dried, tart blackcurrant powder.

A sandwich of thin toasted rye bread and crisp chicken skin with a smoked cheese and broad bean filling.

A pot filled with 'soil' (crumbled malt flour and beer toasted hazelnuts) and planted with baby radishes and turnips

And finally wavy slices of toast feathered with tiny herbs and flowers and dusted with dried apple cider vinegar powder.

That was just the beginning.

The 12 course dinner that followed was a spectacular celebration of pristine ingredients and unique preparations.

The most memorable dishes included -

Lobes of sweet, rich sea urchin harvested from icy Norwegian waters, scattered with frozen powdered dill and cream and spotted with balls of cucumber coated in cucumber ash.

Beef tartare, scraped from the fillet with a sharp knife, studded with grated horseradish and rye bread crumbs, topped with sharp wood sorrel leaves, to be picked up with fingers and dragged across powdered juniper berries and a tarragon herb cream.

And caramlised batons of salsify, cloaked in milk skin, nestled in inky black truffle sauce and topped with shaved truffles from Gotland.

Along with Arzak and El Bulli, definitely one of the best dinners we have been lucky enough to have so far.

Strandgade 93
1401 Copenhagen K
Tel: +45 3296 3297
e-mail: noma@noma.dk

Sunday 22 November 2009

One reason why I love Copenhagen

Where else in the world can you land and before you even set foot on local soil...

Order a hot dog, with all the trimmings. And a beer.

Welcome to Steff's Place, in Copenhagen airport's baggage reclaim hall.
These hot dogs were awesome after a tedious, delayed flight. The frankfurters are grilled until the skins blister and char a bit. Then the sausages are stuffed into buns that taste of nothing, so as not to interfere with the lashings of mustard, ketchup, sauerkraut and crunchy fried onion bits. We washed them down with a pint of pilsner, whilst idly keeping an eye on the carousel.

My mum loves hot dogs. A gaggle of well groomed Danish ladies tucking in next to us looked like they love hot dogs. The kids and their dads in the queue behind us looked like they loved their hot dogs too.

Every airport baggage reclaim should have a hot dog stand!

Sunday 15 November 2009

Squished squash soup


The wonderful thing about squash is each type tastes noticeably different, from the creamy mild butternut to the denser, nuttier red onion and the rich, sweet kabocha. Its worth making a soup out of every variety you can get your hands on at least once, so it's a while before this recipe will start to get boring.

Serves 3-4

Ingredients:
roughly 800g cubed and peeled squash: butternut, kabocha, red onion or any others
a medium to small onion, chopped
olive oil
ground cinnamon
nutmeg
salt and pepper

Split your squash in half and scoop out all the seeds. Chop the rest into chunks, slicing off the skin as you go along, until you end up with pieces that are roughly similar and bite sized.

Place the onion and a pinch of salt into a puddle of olive oil in a saucepan, cover and set over a low heat. Let the onion sweat gently until it turns soft and translucent and then starts to colour and caramelise, this should take up to ten minutes or so.

Turn the heat up to high, add the squash, some salt and pepper and give it all a good stir. Pour over enough water to just cover the squash, cover the pan and bring to the boil. Let the squash bubble away for 15 to 20 minutes, depending on how much you have. You'll know its done when your cubes have melted into soft pulp.

Turn off the heat and blend everything into a soft, velvety consistency. Adjust the seasoning by adding little sprinkles of cinnamon and grated nutmeg to the hot soup, blending and tasting after each addition. Every squash is different and I find the amount of sweet cinnamon or fragrant nutmeg that I want varies each time so I prefer to add it at the end. Finish with freshly ground black pepper and more salt if needed.

I love eating this soup on its own in big steaming spoonfuls, then reheated in the following days and garnished with a dollop of crème fraîche, a scattering of paprika or cayenne powder and a squeeze of fresh lime.


Sardinian style cuttlefish stew


This recipe was inspired by a beautiful baby octopus stew at Olivomare, one of my favourite restaurants. They specialise in Sardinian seafood - big bold flavours and perfectly cooked fish. Every time I visit I leave feeling euphoric.

Cuttlefish are one of seafood's unrecognised gems. They may look icky and covered in black ink at the fishmonger's, but you can get them cleaned - make sure to keep the tentacles! Gently simmered for an hour, cuttlefish is more tender than octopus, and tastier than squid.

This is one of those dishes that makes you sit back afterwards and just smile.

You can make shellfish stock easily from any shells - I used the leftover crayfish shells from our feast but prawns, crab, lobster if you've been lucky, or anything else will do fine. Just brown them in a saucepan with a large knob of butter until they smell delicious, pour over enough water to cover the shells and bring to the boil. I like to let the shells cool in the stock, then break them up with a wooden spoon and strain the whole lot through a colander and then a very fine metal sieve. Your stock will be a rich ochre colour and smell musky, like a concentrated shellfish bisque without any cream added.

Serves two for supper

Ingredients:
a small onion, finely chopped
a cuttlefish, cleaned by your friendly fishmonger, cut into large bite sized shapes
half a glass of white wine
about 500ml shellfish stock
a chilli, split in half
three tomatoes
a tablespoon of tomato purée
olive oil
lemon juice
flat-leafed parsley, roughly chopped
salt and pepper

First skin the tomatoes. Cut a cross in the base of each tomato. Keep the cuts as shallow as possible - you want to slice the skin but not the flesh. Bring a saucepan of water to boil, add the tomatoes and turn the heat down to very low. In about 30 seconds or a minute you'll see the skins start to peel away. Remove the tomatoes and put them into a bowl of cold water. You should be able to peel off their skins easily. Chop them coarsely and set aside.

Put the onion in a puddle of olive oil in a heavy bottomed pot, cover and allow to soften gently over a low heat for five to ten minutes. Once the onions are translucent and soft, turn up the heat and add the cuttlefish along with some salt and pepper.

You want to sear the cuttlefish until it starts to smell fragrant and delicious, about five minutes or so. Then add the white wine, scrap the sediment from the bottom of the pan, and add the stock, tomatoes, chilli and tomato paste. Bring everything to the boil and simmer gently for an hour without a lid, allowing the sauce to reduce.

Finish the stew with a little lemon juice, just enough to make the cuttlefish sauce sparkle, and a scattering of chopped parsley.

Eat in big steaming bowls, with warm chewy crusty bread to mop up the juices.

Crayfish feast

Ro and I spotted some live crayfish for sale at our local farmers market this weekend.

So we put them in a big pot with a bottle of pale ale and set the heat to 'high'.

When their shells turned red they were done. We tipped them into a big bowl, cracked their shells and ate them with salt and lemon.

Crayfish are sweet, tender and completely delicious.


Sunday 8 November 2009

Fruity fiery chilli sauce


I am completely addicted to chilli sauce. Recently I made about a litre of the stuff and since then its featured in pretty much every dinner in some form. It's a brilliant marinade for spicy hot chicken wings, a dip for pizza crusts, a quick sauce for noodles, hell, I even had it on vanilla ice cream and it was awesome.

Making chilli sauce is simple enough, but the fun part is making it exactly how you like it. Whether it's fiery hot or mild, syrupy sweet or sour, a freshly made chilli sauce tastes bright and fruity, a world away from store bought jars. I'd recommend wearing rubber gloves when removing the seeds - not only do chillies stain your hands, but the compound that produces heat, capsaicin, lingers on your fingertips even after lots of hand washing. I found out the wrong way when I rubbed my eyes after making my first attempt at this recipe...

Ingredients:
500g fresh red chillies
a clove of garlic, crushed
an equal amount of ginger, peeled and grated
25ml of rice wine vinegar
2 teaspoons of sesame oil
juice of 1 and a half lemons
1 tablespoon of sea salt
a few very hot chillies, like scotch bonnets (optional)

You'll need a food processor for this. You could maybe try using a stick blender - if you do let me know how it goes!

Slice the stems off the chillies, then split each one in half lengthways and remove all the seeds and white pith. Chop the chillies roughly and put them in a food processor with the rest of the ingredients, except for the very hot chillies if you are using them. Whizz everything into a pulp, then have a tiny taste. If the sauce is too mild for your liking start adding the scotch bonnets one by one. Mix thoroughly each time before tasting again, until you're happy with the result. Your chilli sauce should keep for a long time in the fridge.

Wednesday 7 October 2009

Cobnuts

Whoa, its been a while. September sped past in a haze of summer holidays and job interviews and suddenly it is officially Autumn. I can tell because the sky has become a low hanging ceiling of dense grey cloud for several days now, and the rain keeps coming, and coming.

On a better note this also marks the arrival of cobnuts. Cobnuts are to hazelnuts what Cox's Pippins are to apples - a cultivated variety. Young cobnuts have green shells and husks and taste almost milky, with a fresh acidity. These are the ones I like best, picked before they turn brown, when the nut dries and tastes more like the familiar hazelnut.

Crack open a bunch and toast them in a dry pan until they brown and smell inviting. Then drop in a small knob of butter to finish them with a sizzle. Tip the hot nuts into a bowl and sprinkle generously with sea salt. Eat them straight away while they are toasty hot. If you like, add some lemon juice and cayenne pepper to spice them up.

Friday 21 August 2009

The best Kim Chi, at last

After months of experimentation and kilos of cabbage eating, I finally have a kim chi recipe I am happy with. This probably sounds ridiculous, I mean, its kim chi, how hard can it be? Cabbage, chilli, garlic, ginger - mix it up and Bob's your uncle, right? Apparently with me, wrong.

With a vegetable as watery and bland as Chinese cabbage (really, its only redeeming quality is its crunch), a few flavourings go a long way, and for weeks I ended up with batches of Korean pickle that veered between having waaaay too much salt, sugar, chilli (creating 'Atomic Kim Chi'), ginger, garlic or any combination of these. You name it, I overdid it.

I have finally learned my lesson and realised that less is more, but the rate at which I am churning and fermenting kim chi at a rate is still being overstripped by how quickly I eat it. Want some crisps? Kim chi! Feeling peckish? Kim chi! Feel like breakfast? Kim chi! Hell, any time you feel like munching? Kim chi!!

My method is not the traditional way of preparing classic kim chi, but I think it suits modern kitchens as it is significantly less stinky than fermenting the cabbage whole in a cool dark place, with seasonings layered between each leaf. I'm no expert but I thought this was a pretty interesting round up of general kim chi related info.

Try to find Korean chilli flakes and fish sauce. You could substitue fresh or crushed dried chillies with no seeds, and Thai or Vietnamese fish sauce, but the results won't be quite the same. I'm afraid I have no idea how to pronounce the names for the ingredients you need in Korean, but here's a picture - I showed a similar one to a nice lady in Korean supermarket and she was able to help.

You could leave out the daikon and/or the spring onions, but I think they both really add to the final flavour of the kim chi.

Ingredients:
1 large Chinese cabbage, approx. 1.25kg, cut into thick 5cm rounds, then quartered into squares
10% of the cabbage weight in sea salt, so 125g in this case
1 fat clove of garlic, crushed or finely grated
A small chunk of ginger (equivalent to half of the garlic), finely grated
3 spring onions, finely sliced
an equivalent amount of daikon, peeled and cut into 1cm wide batons
2 tsp Korean fish sauce
2 tbsp Korean dried chilli powder
1 tbsp sugar

Combine the cabbage and salt together in a large bowl, or two, and toss together until all the leaves are well salted. Leave the bowl(s), uncovered, for four hours. If you happen to be passing by give them a quick stir. Fill the bowl(s) with cold water and let the cabbage soak in the brine for one more hour. Try a leaf - it should be very salty, but not so salty it is unpleasant to eat. If you find the latter, drain the cabbage, rinse and soak in cold water again for half an hour or so before trying again.

Drain the cabbage and while it is in the colander push down on the leaves with your hands. You want to squeeze out some of the moisture. You will see the cabbage turns from opaque white to a more translucent clear colour as you squeeze. The cabbage should now be about half its original size, having lost about a third of its weight in salt water.


Put the cabbage into a bowl and add the rest of the ingredients.

Now, using your hands, get right into the cabbage and squish, squelch and squeeze away so the dried chilli powder bleeds red into everything and the garlic, ginger and onion flavours are mashed into the cabbage and daikon. Take the time to do this thoroughly so that you really work the seasonings into each piece of cabbage. Wear plastic gloves if you don't like the garlicky, onion-y smell on your hands as it can linger a bit (I love it). Definitely wear gloves if you have any kind of cut, even a paper cut!

When it looks and smells delicious, taste a piece and then put the whole lot into an airtight container, seal and leave for up to a week or so, depending on the ambient temperature. Right now in my relatively warm London kitchen, three days is enough.

You'll know it's ready when your cabbage changes in taste and takes on a lovely sourness. The chilli might taste a little hotter, and all the flavours will have melded into one - kim chi!

Thursday 13 August 2009

A jar of Asian pickles, or four


Its taken me a while to post this recipe because the very nature of it is always changing. I have finally realised that, rather than trying to produce the perfect brine immediately, this is something that has to evolve slowly over time, like a personality.

I have been eating pickles all summer long, while watchjng TV, for breakfast, dipped in chilli sauce, rolled into Vietnamese spring rolls, or to add a sour crunch into any recipe. In fact I'm eating them right now.

The beauty is, if you're not happy with the taste of one batch, you can change the seasoning and taste the difference in less than a day. Keep eating and changing the mix and you get a feel for how to achieve what you want. You can experiment with added a sliced fresh chilli, a spoonful of spices, some garlic, or anything else that takes your fancy. I have four jars of pickles now and each one tastes different depending on what I feel like.

You can use any crunchy vegetable. Daikon is my favourite as it soaks up the vinegar quickly, in just a day, and has a lovely crisp crunch and clear taste. I also like carrots although they usually need to sit for a day or two more. I bet you could use any radish, cucumber would be lovely, cabbage of course, just to name a few options. I have been so in love with daikon I haven't wanted to try anything else yet, but I will...umm...soon?

This basic recipe makes enough to fill one 850ml jar.


Ingredients:
300ml rice vinegar
300ml water
2 tbsp Chinese rock sugar
1 tbsp sea salt
400g daikon, peeled and sliced into finger sized sticks
2 tsp rice wine

Combine the vinegar, water, salt and sugar in a pan, cover and heat until all the crystals dissolve. Bring the liquid up to the boil then remove from the heat and allow to cool to room temperature, still covered.

While the liquid cools, put the jar and lid into a big pot of cold water, bring to the boil and simmer for 10 minutes or so to give them a good clean, then drain and allow to cool. Its best not to try pouring in cold liquid when the glass is hot as it could crack.

When everything is back to room temperature, pack the jar loosely with the daikon, add the rice wine and fill it with liquid up to the neck. Make sure all the vegetables are submerged in the vinegar before sealing tightly, then put it in the fridge.

The daikon only needs a day to marinate before it's ready to eat. This is when the fun begins - each time you eat, top the jar up again with more vegetables, taste the brine and add more vinegar, sugar, salt, wine or any other seasonings depending on your tastes.

Over time the pickling liquid takes on some of the characteristics of the vegetables you put it. I have one jar exclusively for daikon, and others are a mix of daikon and carrot. You can also add garlic, spring onion, chillis, Sichuan pepper, star anise, cinnamon, green peppercorns, or anything else that takes your fancy.

You could try packing the jars while they are hot and pour in hot liquid - this gives the pickles a more translucent appearence, different texture and stronger flavour. I prefer using cold jar, cold vegetables and cold pickling liquid as I find the taste is fresher, more raw.

This method of pickling is perfect if you eat the pickles fairly regularly, and is not meant for long term preservation. The pickles should always be kept in the fridge or they may spoil. Sometimes I find one of my jars tastes a little fizzy - the result of lactic bacteria fermenting the sugar in the liquid. It is not harmful, but if, like me, you don't like the taste, strain the liquid, bring it to the boil, allow to cool and return.

Friday 7 August 2009

Mmmm....little crabs

No recipe, just a bunch of teeny little crabs we caught, sizzled in hot oil and sprinkled with salt. Sort of seafood popcorn!

Juicy, salty, black bean clams


My idea of how black bean clams should taste is so addictively delicious that it is heartbreaking when the actual dish I have made does not taste as I imagined. In my mind, you should have bouncy, juicy clams, scented with garlic and undertones of ginger, enlivened with the crunch of spring onions, warmed with chilli and spiked with salty nubs of mashed black bean.

I've tried making this before and often ended up with either an imbalanced sauce (too weak or overly salty) or over/undercooked clams. Finally I realised that trying to get both things right at the same time was too difficult. Instead I tried splitting them - there's an extra step in this recipe but I really think it helps give good results.

We used clams dug of of the sand on Pearson Island's only tiny pebble beach, rinsed and left in seawater with a spoonful of rolled oats for a day to purify.

1.5kg clams, large fat palourdes are ideal
50 ml shaoxing wine, or white wine/dry sherry
3 tbsp groundnut oil
5 garlic cloves, peeled and finely chopped
2cm ginger, peeled and finely chopped
5 spring onions, thinly sliced, white and green parts separated
1 chilli, finely chopped
1 1/2 tbsp fermented black beans, rinsed and roughly mashed
1 tbsp dark soy sauce
3 tbsp chicken or vegetable stock
1 tsp cornstarch, dissolved in a little water
Sugar

Put the clams into a dry wok or deep saucepan, add the wine, cover and steam over a high heat, shaking the pan every now and then, until the clams start to open. Remove opened clams and transfer to a covered bowl to keep in the warmth and moisture. Discard any stubborn clams that refuse to open after 10mins or so of cooking, and reserve the leftover liquid.

Heat the wok over a high heat until smoke rises. Add the oil, swirl then add the garlic and ginger. Stir fry quickly until they smell fragrant without starting to burn, then add the white spring onion and chillis and stir fry again until you can smell their aroma. Turn down the heat if they start to burn too quickly. Add the mashed black beans, then the reserved clam juice and the stock. Allow the liquid to come to the boil, taste and add the dark soy sauce bit by bit, tasting as you go. You may not need it all. If the broth tastes too salty, add some sugar, barely teaspoon as a time. The sauce should not be a little sweet and not too salty, depending on your tastes.

When the seasoning is adjusted to your liking, stir the cornstarch and water mix and add, then return the clams to the pan. Keep stirring and tossing for 5 minutes or until the clams are cooked but still juicy and tender and lightly coated with glossy black bean sauce. Add more water or stock if the sauce becomes too thick, and adjust the sugar and soy sauce balance one last time.

Scatter over the green spring onion slices and tip onto a large serving plate, scraping out all the remaining sauce and dribbling it over the clams. Eat immediately with your fingers, sucking the clam meat and sauce off the shells.

Friday 31 July 2009

Melted marrow


You may have seen enormous marrows at a market recently. Or perhaps like Sibilla you have been growing courgettes this summer and left the patch untended for a few days, returning to discover that your sweet little courgettes, left unpicked, have swollen into humongous Mr. Hyde versions of themselves.

"We'll feed them to the pigs." was our first reaction, but wait! These are summer squash, related to their winter cousins pumpkin and butternut, which are also capable of reaching gargantuan sizes. Surely there must be something we can do?

I am very fond of marrows now.

They do need some gentle love and attention, but you'll end up with the perfect comfort food. We ate this with roast chicken, braised rabbit and on its own in big steaming bowlfuls.

The trick is to separate the pale, creamy yellow flesh inside from the rest of the monster. Once cooked, marrow has a delicate, clear flavour than reminds me of Chinese winter melon and the consistency of softened butter.

First cut the marrow down into manageable sections and remove the dark geen skin with a sharp knife. These blocks can then be sliced into rounds and chopped into cubes. I throw away the spongey, seedy parts as I find them stringy and chewy.

Serves 6-8 as a side dish

Ingredients:
One or more marrows cut into cubes roughly 5cm wide and 3cm high, 2-2.5kg
5 large cloves of garlic, peeled and crushed with some salt
Olive oil
Salt and pepper
A cup of water

You'll need a big pot that can hold all the marrow, preferably heavy based. Generously cover the base with about 1cm of olive oil, add the garlic and sprinkle liberally with salt and ground pepper.

Add a third of the marrow cubes and then stir well until every cube is coated with oil and seasoning. Repeat with the remaining two thirds of marrow and finish with a final glug of oil and a scattering of salt and pepper. Pour over the water and cover with a tight fitting lid.

Place the pot over a low flame and forget about it for 45 minutes. When you lift the lid the cubes should be almost submerged in bubbling golden liquid. Give it another 15 minutes if not. Then remove the lid and leave the marrow to simmer for another 20-30 minutes, or until you can only see a little liquid left.

Coax the marrow into a large serving dish, or ladle into deep bowls straight from the pot. Eat with a spoon.

Wednesday 8 July 2009

48 hours in Vancouver

Sitting in the peaceful quiet of Pearson Island, breathing in pine scented air, it's remarkably hard to remember the sights, sounds and tastes of Vancouver city, where I was just a few days ago. So before the memory fades forever from my hole-riddled mind, here's a few notes from a city that certainly deserves several more gastronomic trips.

Given the brevity of my visit we set ourselves a tight schedule - first on the list, lots of local seafood, both raw as sashimi, and cooked, a little bit. Next? Well, it has to be Chinese, Cantonese style and finally, Jason's favourite spot in town.

First stop was Miko Sushi, recommended by Earnest for good quality, traditional sashimi without emptying your wallet in the process. Miko also offers a large selection of appetizers, many from the robata grill. Jason pronounced their grilled ox tongue to be the best he has ever tasted, for successfully delivering skewers of juicy, springy textured meat, lacquered with sweet-salty sauce and charred around the edges. Robata grilled chicken gizzards were almost as good, but definitely came second place.

We asked for locally sourced fish sashimi. Highlights included frilly fronds of mirugai (giant geoduck clam) that tasted sweet and buttery, generous slices of pale albacore tuna with a rosy blush and fat ivory slabs of toro, ready to melt on the tongue. Sockeye salmon was an almost violent orange-red colour compared to the ghostly tuna, and displayed none of the white fat seams characteristic of most salmon. It made sense that the taste was less rich, more delicate and quite gamey.

The next morning began with a late breakfast of Japanese hot dogs...yes really. The Japadog street cart is reputedly the closest thing to the real deal, outside of Japan. We shared a Terimayo, which is smothered with teriyaki sauce, Japanese mayonnaise, seaweed shreds and fried onions. Instead of the familiar sweet-hot taste found in the US original, this was more porky juices, mild mayo-savoury tang and briny finish, altogether pretty good. Add some tamago egg and you have the Japanese version of an English breakfast bap!


Go fish is little more than a shack, perched on False Creek fisherman's wharf, so near to the sea you could throw your chips in. A collaboration between Fisherman's Wharf and chef Gord Martin, the aim is to raise delicious awareness of local fish.

Wild with excitement, we ordered battered halibut and chips, white spot prawns in sweet and sour coconut sauce and tacones, soft tortilla cones stuffed with coriander, salsa, chipolte cream, 'Pacific Rim' coleslaw (white and red cabbage, sesame and pumpkin seeds, lightly dressed with sesame mayo) and tender albacore or just cooked oysters.

As our order arrived, so did the rain. Fleeing from the unsheltered plastic tables and chairs we took cover under Jason's car boot door. My favourite memory of the whole trip is sitting in the back of the car with my legs dangling over the edge, biting into chips so hot they burnt my fingers, peeling fat rosy prawns and munching tacones dripping with fruity Valentina hot sauce.

There was time before dinner for a quick aperitivo at Rodney's Oyster House, where I savoured a long awaited reunion with my beloved Kumamoto oysters and met some new bivalve buddies - plump, sweet Summer Breeze, the darlings of Vancouver Island, and crisp, briny Village Bays from East Toronto. These were washed down with a lemony 'Zydeco Stew Caesar', apparently Canadian for a Bloody Mary, made with clamato juice and garnished with a prawn.

If this is as appetitively exhausting to read as it is to write then I apologise!

Entering the Golden Ocean Seafood Restaurant was like walking into any decent family restaurant in Hong Kong, all chintzy decor, large round tables and Cantonese cacophony. The food was also just as good. Some say that San Francisco may have lost its edge, leaving Vancouver to be crowned the new capital of Chinese cuisine outside of Hong Kong. We ate roasted duck with glazed skin the colour of mahogany, delicate double boiled tilapia (zi4 yu3) soup, juicy pork and water chestnut patties and a quivering dish of steamed tofu, prawns and oyster mushrooms.

With one lunch left, it was Jason's noodle mecca or a plane straight back to London. On first glance, Sha Lin Noodle House looks like any other shabby cheap Chinese, except all the tables are full and frequently there is a queue. Separated from diners by glass panels, Beijing chefs twirl and pull fresh noodles, plopping them into boiling water and tossing others into bowls to be dressed with soup and sauce.

To make Jason's favourite noodle dish (zha1 jiang4 shou3 la1 mein4), freshly made noodles are essential for their chewy bite. These are topped with little nuggets of chopped pork shoulder in a musky yellow bean sauce and a pile of raw cucumber shreds. You can toss the whole lot together and eat it as it is, or add lashings of black vinegar, chilli oil and/or minced garlic (if you're feeling really strong).

We could have just ordered noodles and been satisfied, but as there was a large menu and a girl with a mission, we also ate translucent hot and sour potato slivers, Chinese cabbage shreds dressed in white vinegar, cool sweet potato starch noodles with sesame paste and black vinegar and fried spring onion pancakes.


Then we left for Langdale ferry.

This is by no means a list of the best places to eat, but on a budget it was pretty good. Vancouver magazine's Restaurants section was a useful resource. It seems to offer a fairly comprehensive list of restaurants, and also gives out annual awards - take a look at the 2009 winners.

Miko Sushi
1335 Robson
Vancouver, BC V6E 1C5, Canada
(604) 681-0339

Miko Sushi on Urbanspoon

Japadog
899 Burrard St
(604) 642-0712

Go Fish Ocean Emporium
1505 West 1st Avenue (at False Creek Fisherman's Wharf)
(604)730-5040


Go Fish Ocean Emporium on Urbanspoon

Rodney's Oyster House
Suite 405 1228 Hamilton St
(604) 609-0080

Golden Ocean Seafood Restaurant
2046 41st Ave W
(604) 263-8606

Golden Ocean Seafood on Urbanspoon

Sha-lin Restaurant
548 W Broadway
(604) 873-1816

Sha Lin Noodle House on Urbanspoon

Wednesday 24 June 2009

Courgette parmigiana


Served warm for lunch or bubbling hot for dinner, this dish is a great way to use up larger courgettes or marrows that appear at the end of the season, or if you find them lurking in your vegetable garden after going away for a week or so. You could use young skinny courgettes instead, but I find their flavour is so sweet I would rather shave them into long thin slices and dress them simply with barely a half clove of crushed garlic, some lemon juice, mint and olive oil.

The important thing to remember is to make sure, whatever the size, the slices are cooked until they are floppy and nicely charred. A cast iron grill pan is great, or a less heavy non-stick grill pan will work just as well. You just want the raised ridges to create those lovely charcoal lines that give the courgettes an added smokey flavour.

The consistency of the tomato sauce is quite key as it will affect how dry or watery the finished parmigiana will be. You can tell the sauce is ready when individual rising bubbles settle into one place and make a pleasant 'blip blip' sound. It should be thick enough to coat pasta, but still pourable.You could use only tinned tomatoes instead of the passata, but the sauce will need more reducing. In Tuscany there's a brand called Mutti who make an excellent tomato polpa (crushed finely).

I like to use a clear pyrex oven dish as it shows off the lovely red, green and pale yellow layers, but really any ovenproof dish will do, even a tall round one. The oval dish I used in the photo was 33.5cm by 22.5cm at its widest, and 6cm high.

Serves six as a main course, or many more as an accompaniment.

About 1.5kg of courgettes or marrows
425ml tinned tomatoes, crushed
750ml tomato passata
A small onion
Two level teaspoons of sugar
250g Parmesan
250g aged pecorino, or Corzano e Paterno's pasta cotta
A lemon, sliced in half
Salt and pepper
Olive oil

Preheat the oven to 180 degrees Celsius.

Heat a grill pan over a medium to low flame. Slice the courgettes into rounds roughly half a centimetre thick. Sprinkle with salt to draw out some of the moisture. The pan is ready when it starts to smoke, brush some oil lightly over the pan and quickly add a batch of courgettes, enough to cover the base with a layer. Char the slices for 3-4 minutes on each side and brush a little oil on any that start to look dry. Try not to overdo the oil as the courgettes should steam quite happily and excess oil will make the final dish greasy. Allow the courgettes to cool enough to handle.

While you wait, chop the onion into fine dice and sweat with salt and olive oil in a saucepan over a low heat. Try not to let them brown. When the onion is translucent and soft, add the tinned tomatoes and passata. Add the sugar but do not season until the sauce is ready to avoid overdoing it. Give everything a good stir, bring it to the boil then simmer gently until the sauce has reduced to a thickish, but still sloppy, consistency. Season with salt and pepper to your taste and allow to cool a little.

While the sauce reduces, coursely grate the parmesan and pecorino and mix together. There's no need to bother with super fine cheese.

Brush your dish with oil and start with a thin layer of tomato sauce. Cover with a layer of overlapping courgette slices until no sauce is visible, then squeeze over some lemon juice and season lightly. Next sprinkle over a thin layer of cheese; you will still see bits of green underneath. Repeat with a layer of tomato sauce first and continue layering courgettes, sauce and cheese until everything is used up. The last layer should be a thick topping of cheese to blanket everything else.

The parmigiana can be prepared in advance up to this point. If you freeze it do allow it to defrost thoroughly first.

Season the dish one last time, drizzle over with olive oil and pop it into the oven. It should take roughly an hour, check after 45 minutes. The cheese topping should be melted, golden brown and bubbling. The dish will be very hot, and can sit in the warmer or a turned off oven without coming to any harm.

Serve as a side dish, or with a lemony green salad and crusty bread as a main.

Porcine perfection


From Sausage Fest in Basel to a pork feast in Tuscany, Sibilla's birthday at Villa Paterno was a true celebration of all things pig.  The spit roasted Cinta Senese adolescent in the photos was a gift from her half brother Tillo and the offspring of two Cinta Senese pigs serendipitously found wandering around his garden a few years ago. 

This ancient breed of Sienese pig, native only to the Chianti region since at least the 14th century, is identifiable in life by white forelegs and shoulders (cinta is Italian for 'belt' in reference to this distinct stripe of white skin) and in death by an extremely high proportion of fat to meat.

Reared semi-wild on a diet consisting mainly of grass, chestnuts and acorns, both flesh and fat are highly prized, being rich, fragrant and highly flavourful.  The Cinta Senese almost became extinct when farmers shunned the high production costs involved and opted to raise modern breeds of white pigs, seen as more economical and suited to today's market demand. Thankfully a few dedicated breeders in the Sienese Mountains refused to give up, and a recent revival of interest in Cinta pork has helped to prevent this unique breed from disappearing altogether. 

Today there are roughly eighty Cinta breeders in Tuscany. With creatures this special it feels all the more important to ensure that not a single part of the animal is wasted.

Our little pig was spit roasted on Saturday night by Marinella's husband. Great chunks of fatty, tender meat and crisp blackened skin were piled onto wide shallow dishes and served with raw marinated courgettes, melted courgettes and courgette parmigiana, thanks to a garden glut of guess what? 

Being me, I noticed that the head, split in two, was left untouched in favour of less intimidating cuts and pounced, like a cat. First the brains were scooped out and eaten with a sprinkle of salt.  They tasted like an unctuous, creamy, mild pâté. Two halves of a tongue swiftly followed suit. Finally a pair of cheeks, soft and porky, smeared with a whisper of sweet and sour chutney. It was a heaven-sent dinner.

The nest day leftovers were boiled into a meaty broth, rendered for lard, crisped back to the last slivers of crackling and shredded for a cold lunchtime salad with sliced red onion, fennel, tomatoes and lettuce, combined with a lemony mustard vinaigrette to help cut through the fat embalmed meat. Any further remainders were given to Clare and Matilda, white, fluffy Maremmano dogs who's ancestry dates back to the same period as the Cintas. 

In my mind it doesn't take much to recall the the musky sweet scent of Cinta fat. We cooled it to a creamy white consistency and used it for days later, in wild boar cacciatora, to baste a roasting chicken, and for spreading over toasted Tuscan bread, rubbed with garlic and sprinkled with salt.


Monday 15 June 2009

Thrifty chicken liver pâté


I have to be honest, the only reason I decided to make this is because I caught sight of tubs of frozen chicken livers being sold at Sainsbury's for a mere 44p.

44p! That's less than a bag of crisps! Add butter and a few other bits and you have a smooth, creamy, savoury pâté that could be elegant enough to be a dinner party starter, or a cosy supper with plenty of toast, maybe some cornichons, and a lemony, mustardy dressed green salad.

I like the taste of chicken livers, so I prefer to use less butter and more seasonings to create a balance of sweet, salty, herby and bitter flavours. Alternatively you could increase the butter by up to double for a milder, richer version. If you do this you may need a touch more salt. The trick is to keep tasting while you blend and season, until it is as you would like it.

250g chicken livers
whole milk
125g salted butter (or up to 250g if you prefer)
half an onion
a clove of garlic
2 tablespoons of port, or brandy
2 teaspoons fresh thyme leaves
cayenne pepper
nutmeg
salt and pepper

Rinse the livers, pull off any white membranes and cut off any green looking bits. Put them in a small, heavy based saucepan with knob of butter. Pour over enough milk to just barely cover the livers, then heat very gently over a low flame, stirring every now and then and breaking up the livers as they cook until there are no traces of pink left. This should take 10 minutes or so, be careful not to let them form a crust or the finished pâté will be grainy.

While the livers cook, finely chop the onion and soften gently with butter and a pinch of salt in another pan. Finely chop the garlic (or grate it with a microplane - these are amazing for garlic, ginger, zest, to name a few things) and add to the pan. The onion should become translucent, stop before it browns. When the onion is soft, add the port or brandy and half of the thyme leaves. Strain the milky liquid from the livers with a fine metal sieve and add the to onions. Turn up the heat to medium and reduce the milk and onion mixture until it has the consistency of a thick sauce. Season with black pepper, a light sprinkling of cayenne pepper and the same again of grated nutmeg.

Combine the cooked liver and the seasonings in a food processor and whizz until smooth. Or you could push the whole lot through a fine metal sieve. Allow the mixture to cool abit so the butter won't melt when you add it.

When the mixture is cool, blend in the remaining thyme leaves and the butter in cubes and taste after you have mixed in about 100g. Now is the time to taste and add more salt, pepper, cayenne or nutmeg. The nutmeg should lend sweetness to the pâté, while the cayenne gives an undertone of warmth - don't overdo the cayenne as the pâté should not be spicy hot. If the pâté tastes too strong, add more butter.

Pour the pâté into a dish to set. This pâté will keep for a few days if covered and in a fridge. If you plan to keep it for longer, cover the top with clarified butter.

Sunday 14 June 2009

The best asparagus

Hello hello!

I've been rather quiet on the writing front recently, partly due to distractions like job interviews, Mum coming to visit, and a trip to Switzerland to check out Giacometti, contemporary art and 'Sausage fest 2009'. The latter is an annual celebration of all things wurst that began with my delicate, elegant Chinese mother declaring her secret love of sausages when the Meijers were debating what to serve forty odd artists, collectors and exhibitors after a long day at Art Basel.

Every other moment in London has been occupied by eating asparagus.

Here's a few favourite ways for doing the same thing. The recipes are so simple it might seem silly to write them down, but as I could eat them every day for the whole short season without getting bored, I think they are worth mentioning.

Serves two as a starter, or one...

Asparagus with lemon and butter

My first asparagus of the season is always dressed with lemon and butter. Somehow, olive oil won't do, it almost tastes too floral. To me, butter smells of earth, grassy fields, dairy cows and rich indulgence. The lemon juice provides a lift, highlighting the sweetness of the spears. Finally the salt should have enough texture to give you that satisfyingly salty crunch when you bite down on the soft stems.

A bundle of asparagus, around 250g
A few thin slices of the best salted butter you can find, ideally English or Irish
Half a lemon
Sea salt flakes

Snap off the woody parts of the asparagus by bending each spear near the base. If the stalks are really fat and meaty, I like to shave some of the green skin off with a vegetable peeler, otherwise I don't bother.

Bring a large saucepan of water to the boil, salt liberally and add the asparagus, stems first. Its fine if some of the tips stick out of the water as they will steam nicely. If you have a steamer you could steam the whole lot instead, it only take about a minute longer, if that.

While you wait, smear a slice of butter over the centre of your plate(s) and sprinkle with salt and pepper. The asparagus takes 4-5 minutes, depending on the size of the stems. If you fish one out and cut off a piece it should have lost its raw crunch but not be mushy soft.

Drain the asparagus well to get rid of excess water. Before serving, rub with the rest of the butter, squeeze lemon juice all over, season again and eat immediately with your fingers.


Asparagus with balsamic vinegar

I was reading 'Comfort me with apples' by Ruth Reichl on the way back to London. Her description of eating asparagus, dipped in her first taste of 'aceto balsamico', stirred up such a craving I was fidgeting on the the plane, fantasising on the tube and rolling my luggage around Waitrose hunting for asparagus shortly after.

Use the best balsamic vinegar you can find or afford - it should be, in Ruth's words, 'thick enough to cling' and taste raisiny sweet, balanced with sour vinegar. Definitely avoid the mass produced versions that contain water, sugar, E numbers and colourings, choose one made in Modena and aged for at least twelve years. Riserva di Famiglia, made by Acetaia Dodi is a great option and available in small measures, perfect since a little goes a long way. Right now at home we have a matured balsamic vinegar from The gift of oil, which is delicious.

A bundle of asparagus, around 250g
Sea salt flakes
Aged balsamic vinegar, ideally Tradizionale or of a similar quality

Prepare and cook the asparagus as above. Pour the vinegar into something small and shallow like a soy sauce dish. Plate the asapargus, sprinkle with salt and eat straight away, dipping each stalk as you go.


Charred asparagus and prosciutto

A bundle of asparagus, around 250g
8 or so slices of prosciutto crudo, I like San Daniele most
Sea salt and black pepper

Parboil the asparagus for two minutes and drain them well. Brush the stalks with olive oil and finish them on a barbeque or a cast iron grill pan over a high heat. You could skip the parboiling, but it will take longer and you need to keep the heat medium to low to stop the spears burning before the centres are cooked. I like the contrast of soft stalk and smoky charcoal, which seems easiest to acheive if you boil them first.

Season the asparagus and eat while hot, winding half a slice of prosciutto around each stalk so the fat melts and the ham warms.

Saturday 23 May 2009

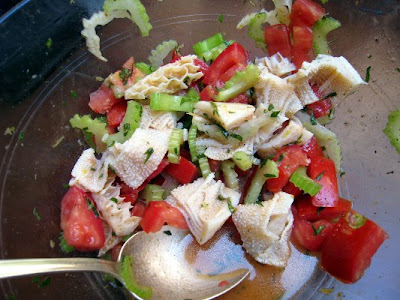
Honeycomb tripe salad

I know that for most people, tripe is one of their least favourite foods, to put it mildly. It's associated with memories of gigantic pots of boiling stinkiness, force feeding in childhood, and acts of human unkindness. But I love it.

Maybe it's due to my Chinese upbringing and the constant encouragement to try suspicious looking foods, or just that the Cantonese cook tripe with such savoury, piquant sauces you'd be a lunatic not to like it. Nevertheless despite my fondness, until now I had only encoutered tripe hot, either 'a la fiorentina' (submerged in a sweet, smooth tomato sauce) or in dim sum. Cold tripe was a revelation.

We bought our tripe from an incredible stall in Florence's Mercato Centrale, called Nuova Tripperia Fiorentina. It specialises in all things cooked cow offal. It may not be everyone's cup of tea, but Sibilla and I thought we had found a small stall from heaven. Along with several different types of tripe, you can buy cooked trotters, snout, udder and uterus to name a few.

Feeling brave we bought a slice of udder (called poppa in Italian), procrastinated over cooking it, and finally seared it on a high heat with a dusting of seasoned flour. Sprinkled with lemon juice it was delicious, almost cheesy tasting. I know that sounds deeply wierd, but really it was delicious!

Serves two for lunch or four as part of lunch

300g cooked tripe, the one with a honeycomb texture works best, but any will do
Three large tomatoes, coursely chopped
Two sticks of celery, thinly sliced
Half a red onion, finely chopped
Juice and zest of a lemon
Half a tablespoon of red wine vinegar
Olive oil
Salt and pepper
A good handful of parsley, mint, or both

Slice the tripe into thin, bite sized strips. Add the tomatoes, celery and onion, then season well and toss together with the lemon, vinegar and olive oil. This salad is best eaten cold so leave it to marinate in the fridge for a few hours.

Just before you serve, roughly chop the parsley and mint, scatter over and toss again. The tripe should have a cool, crunchy texture, which is lovely soaked in its earthy, lemony sauce and given sparkle by brightly flavoured herbs.

Here's a picture of some tripe from Nuova Tripperia. As soon as I can persuade Sibilla to translate the Italian, or sit down with my Italian-English dictionary, I'm going to try the recipes on the website.

Courgette and mint ceviche

Again this is best with small, sweet courgettes rather than the larger fatter ones that tend towards becoming marrow.

Serves four to six as part of a lunch spread

4 young courgettes
half a red onion, peeled and finely sliced
juice of a lemon
a good handful of mint leaves
a pinch of chilli flakes, crushed as finely as possible with your fingers or a mortar and pestle
olive oil
salt and pepper

Finely slice the courgette into paper thin rounds, or shave with a mandolin. Season with the crumbled chilli flakes, salt and pepper and toss with the red onion, lemon juice and a generous coating of olive oil.

This salad is even better if you have time to leave it for an hour or so to marinade. The acid from the lemon softens the courgette and onion, giving the salad an almost lightly cooked texture.

When you are ready to serve, layer the mint leaves one on top of another, roll them up into a sausage shape and slice into thin shreds, then scatter over the salad.

Baby broad bean Niçoise

This salad is best with young broad beans that taste sweet when shelled and eaten raw. You could use larger broad beans, but it would be a good idea to remove their bitter outer casings first.

We made this with gorgeous eggs with deep yellow yolks from Marcello's chickens and served the chopped tomatoes separately as one of the group was not a fan.

Serves four as lunch or six as part of a bigger spread

Around 800g to 1 kg of shelled baby broad beans
Half a tin of pitted black olives
One tin of best quality tuna in oil, flaked
Ripe tomatoes, coarsely chopped
3 hard boiled eggs, quartered
Juice of one lemon
Olive oil
Salt and pepper

Combine the beans, olives, tuna and tomatoes in a large bowl, squeeze over the lemon juice, season liberally and toss together with a generous glug of olive oil. Taste and adjust the seasonings, then scatter over the eggs when you're done.

Back in Tuscany

Sibilla's farm, Corzano e Paterno, seems almost like a different world from the one I visited in March. The plants have burst into flower and the vegetable garden is an explosion of green and already producing courgettes and mange tout, having finished offering up a bumper crop of sweet baby broan beans. It is sunny with blue skies every day, with hot, lazy days and cooler, balmy nights.

Last week New Zealand shearers came and gave all the Sardinian milk sheep a haircut.


We have been cooking up a storm so here's a bunch of dishes we have been eating since I arrived....

Saturday 9 May 2009

The best gratin Dauphinoise

I love how richly comforting and almost naughty this side dish is. We don't make it too often, but when we do the first sight of butter and cream and bubbling up round light golden discs and overflowing the sides creates an excitement that builds as the time passes. When the gratin finally forms a speckled golden brown crust it's ready. The first hot breath taken when the oven door opens washes over me like a blanket of reassurance, combined with buttery expectation and sweet with roasted garlic. I grab a steamful bowlful and a spoon, curl up, and ignore everything else in the world for a while.

A deep, round ovenproof dish would be ideal. I use a 17cm square ceramic dish with rounded corners and flat handles on either side which is great. It is 6 cm deep. Try not to use anything with less than 4cm depth as you want to end up with lots of overlapping potato layers, sandwiching seasoned cream and infused with garlic, rather than a paltry three layer pancake. The base will be soft and giving, the centre moist and almost chewy, and the top browned and almost crisp.

Serves four as a side dish, or two greedy people.

25g/1oz salted butter
One clove of garlic, peeled
Three large waxy potatoes, peeled and any eyes or discolourations removed
150ml double cream (you may use less)
sea salt and pepper

Preheat the oven to 160 degrees Celsius.

Rub about a half of the butter around the inside of the dish. Crush the garlic on a wooden board with flaked sea salt piled on top and the flat on a large blade pushed down to squash the clove and mash it into a salty, garlicky pulp. Smear this all over the base and sides of the dish, then season lightly with salt and papper.

Slice the potatoes into discs a few millimetres thick, like the thickness of a pound coin. I use a lethally sharp Benriner mandolin, which to me is worth every penny. Just be really careful not to cut your fingers; even Rick Stein managed to do this on one of his cookery programmes!

Layer the potatoes in the dish, with as few holes as possible in between. You might want to cut smaller pieces to fit awkward gaps but don't drive yourself mad - some space is good. It's really important that you lightly salt and pepper every new layer before starting a new one or the finished result will be bland.

Stop just before the top of the dish, push down on the potato layers one last time, and pour over the cream until the last layer is lightly coated. Pinch bits of the leftover butter and dot them all over the top. Season one last time, then put it into the oven for 45 minutes to an hour, or until the kitchen smells wonderful and your gratin is golden brown and bubbling.

Photos to come - last night we finished this before even thinking about the camera...

Friday 8 May 2009

Poussin and caribbean salsa

Serves two with a vegetable side dish or salad

One fat poussin, spatchcocked
A few good pinches of chilli flakes
Juice and zest of half a lemon
A few cloves of garlic
Olive oil
Salt and pepper

Half a cucumber, peeled and seeds scraped out with a teaspoon
Two spring onions
A mild hot green pepper, seeded
A pinch of thyme leaves
Salt and pepper
Juice of a lime
150ml crème fraîche

If you have a mortar and pestle, pound the chilli with some salt and then add the garlic to make a thick paste. Otherwise crush the garlic with the flat of a blade and some salt and crumble in the chilli. Add the pepper, lemon and olive oil and mix together well. Smear the marinade all over the poussin and leave it in a bowl covered with cling film or in a clear plastic food bag for as long as possible before cooking. An hour is fine, four to six hours is brilliant. Turn and massage the meat if you happen to be passing by.

If you have a food processor, blend all the ingredients for the salsa but leave it a little chunky. Otherwise finely chop the cucumber, spring onion and pepper and mix in the other bits. Cover with cling film and leave the salsa to sit for one hour or more in the fridge.

When you are ready to cook, heat a cast iron grill pan over a low heat for at least ten minutes until the pan is hot and smoking. Add the poussin, skin side down and press down on the meat with a spatula so the skin gets lovely and charred. Cook the poussin slowly over a low heat. It will stick to the pan at first, but don't turn it over until the skin releases from the pan on its own. It should take 20-30 minutes to cook the poussin, turning once or twice. To check it is done stick a skewer into the thickest part of the leg and catch some juices with a spoon. If they run clear, without any pinky red blood, then the chicken is cooked.

Rest the poussin for ten minutes on a wooden board under some foil, then chop in half and serve, accomapnied with the bowl of salsa for dipping and smearing.

Photos to come...

Panna cotta with rhubarb compote

This is so easy to make it's almost tempting to mess with the recipe and infuse the cream with ginger, or orange or something to add a twist. But I'm a classicist and there is something pure and lovely about a wobbly, light vanilla pudding, cut with sharp sweet rhubarb.

Actually I did try using marmalade instead of honey but it was a little too bitter...

Serves six

400ml double cream
200ml semi skimmed milk
2 tbsp caster suger
2 cm of a vanilla seed pod
just under 2 teaspoons of gelatine
5 stalks of rhubarb, chopped into bitesize pieces
2 tbsp honey
Water

You'll need six ramekins or small bowls

Preheat the oven to 180 degrees celsius.

Mix the rhubarb with the honey and about a tablespoon of water in an ovenproof dish and bake until the rhubarb is soft, but has not lost its shape, with a lovely pink sauce. Remove and allow to cool before refrigerating.

Combine the cream, milk and sugar in a saucepan (heavy based if possible) and set it over a low heat until the mixture starts to 'shiver'. This is the stage just before it starts to boil, if you see little bubbles rising up take the pan off the heat for a bit. Scrap the seeds out of your vanilla pod and add, along with the pod, to the saucepan.

While the cream is heating, put the gelatine in a small bowl in some hot water and let it melt. Spoon some on the hot cream into the gelatine and stir until well combined. Add a few more spoonfuls of hot cream and mix well, then pour the whole lot back in the saucepan and mix again.
Remove the vanilla pod and discard.

Divide the cream mixture between your six ramekins and allow to cool. If you're in a rush you can put them straight in the fridge but they will still need a couple of hours to set.

When you're ready to serve, just gently spoon chunks of rhubarb with their juices into each ramekin.

Sorry for the lack of photo, to be updated...

Tuesday 5 May 2009

Norfolk nourishment

Happy Bank Holiday weekend! We're just back from three blissful days in Norfolk staying with Tikki's parents the Newmans, who Ronan has declared are 'the most perfect hosts' he has ever stayed with.

I ventured off the coast of England in a sailboat for the first time. We rocked gently in the sunshine and ate soft boiled eggs with pastel blue shells gathered from Derek and Carolyn's Legbar chickens. This was followed with freshly picked Norfolk crab, dressed with lemon juice and homemade garlic mayonnaise.

Other gastronomic highlights included a whole roast goose, rich with sweet goose fat, and a barbequed leg of lamb, marinated in garlic, lemon, parsley and olive oil for a day and charred until crisp on the outside but juicy and blushing rose on the inside.

We ate asparagus from a neighbouring farm, Wiveton Hall, picked just hours before. I have never tried such fresh asapargus before and was not disappointed. As many food writers have proclaimed before me, it really was even more delicious for being just out of the ground. The stems were sweet as sugar, in stark contrast to the earthy, spicy chilli oil and sharp lime crème fraîche sauces that we drizzled on them.

Walking along the dramatic Norfolk cliff tops and then back along the Coast road, we stumbled on Jenny's crab shack, serving up cold crab and lobster with no seasoning whatsoever. No salt, no pepper, not even any lemon. It was incredible - sweet but indeniably from the salty sea.

Photos to come!

Wiveton Hall
Holt
Norfolk NR25 7TE
Tel: 01263 740525
Website: www.wivetonhall.co.uk

Jenny's Crab Shack
On the A149 Coast Road from Sheringham to Weybourne
Tel: 07818 608 439
Open seven days a week from now through till autumn.